Example: Segmenting visitors based on a data layer event
This example shows you how to use a trigger to segment visitors based on visitor data tracked through the Frosmo data layer. This allows you to, for example, pass data from your own CRM or other system to the Frosmo Platform, and use the data for targeting visitors. If there are multiple user states or properties to track, you can create a trigger for each, and use the triggers in separate segments.
In this example, visitors who have the specific user property user_property.up1 (defined in an external system) are segmented. The user property is assigned to users who have purchased a specific item. In this case, the data layer object pushed to the platform is may look like the following example.
{
    event: "user_data",
    user_property: {
        up1: "true"
    }
}
To implement the example:
Creating the trigger
To create the trigger:
-
In the Frosmo Control Panel, in the sidebar, select More > Triggers.
-
Click Create trigger.
-
Define the following settings:
-
Name: Enter "User property 1 true".
-
Evaluation point: Select Data layer event.
-
Rules:
-
Click Add new rule, select Event data, and set the following rule:
The data value of the event property is exactly user_data.
This means that the trigger is fired when user data is passed through the data layer.
-
Click Add new rule again, select Event data, and set the following rule:
The data value of the user_property.up1 property is exactly true.
This means that the trigger is fired when the user data passed through the data layer contains the specified user property.
-
Make sure that the AND operator is selected. This means that the trigger is fired when both of the specified rules are met.
-

-
-
Click Save.
Creating the segment
To create a segment for visitors who fire the trigger:
-
In the Control Panel, in the sidebar, select Audiences.
-
Click Create segment.
-
Define the segmentation rules:
-
Click Add new rule, select Trigger, and set the following rule:
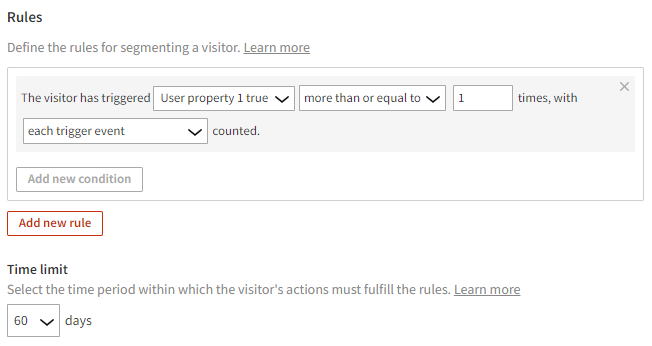
The visitor has triggered User property 1 true more than equal to 1 times, with each trigger event counted.
This means that in order to get segmented, the specified user property must be assigned to the user. Every time the user data is passed through the data layer is counted.
-
Since you may want to segment visitors based on the user property, even if the property was assigned a while ago, set the time limit to 60 days.
-
-
Select Description, and enter "User property 1 true" as the segment name.
-
Click Save.
Visitors whose user data contains the specified user property with the value "true" will now be segmented. To segment users whose user data does not contain the property, create another segment using the following segmentation rule:
The visitor has triggered User property 1 true less than 1 times, with each trigger event counted.
This means that in order to get segmented, the specified user property must not be assigned to the user. Every time the user data is passed through the data layer is counted.
You're done with this example!