Example: Recommending trending products in a category (strategy)
This example shows you how to create a recommendation for products currently trending in a product category. The example uses a recommendation strategy to generate the recommendation data. The example covers the entire development workflow from creating and testing the strategy to creating the modification that displays the recommendation.
In this example, you:
-
Create a recommendation strategy for the top 10 trending products in a given product category. The trending products comprise the top 5 most viewed and top 5 most purchased products in the category in the past 24 hours.
-
Create a customizable template for a product recommendation slider. The template uses the
frosmo.easy.strategies.fetch()function for retrieving the recommendation data generated from the recommendation strategy. The function shuffles the product order. -
Create a modification and associated placement for displaying the recommendation on product category pages. The modification uses the recommendation slider template for its content.
You create all the components of the recommendation in the Frosmo Control Panel.
The following figure shows an example of the final recommendation on a product category page.
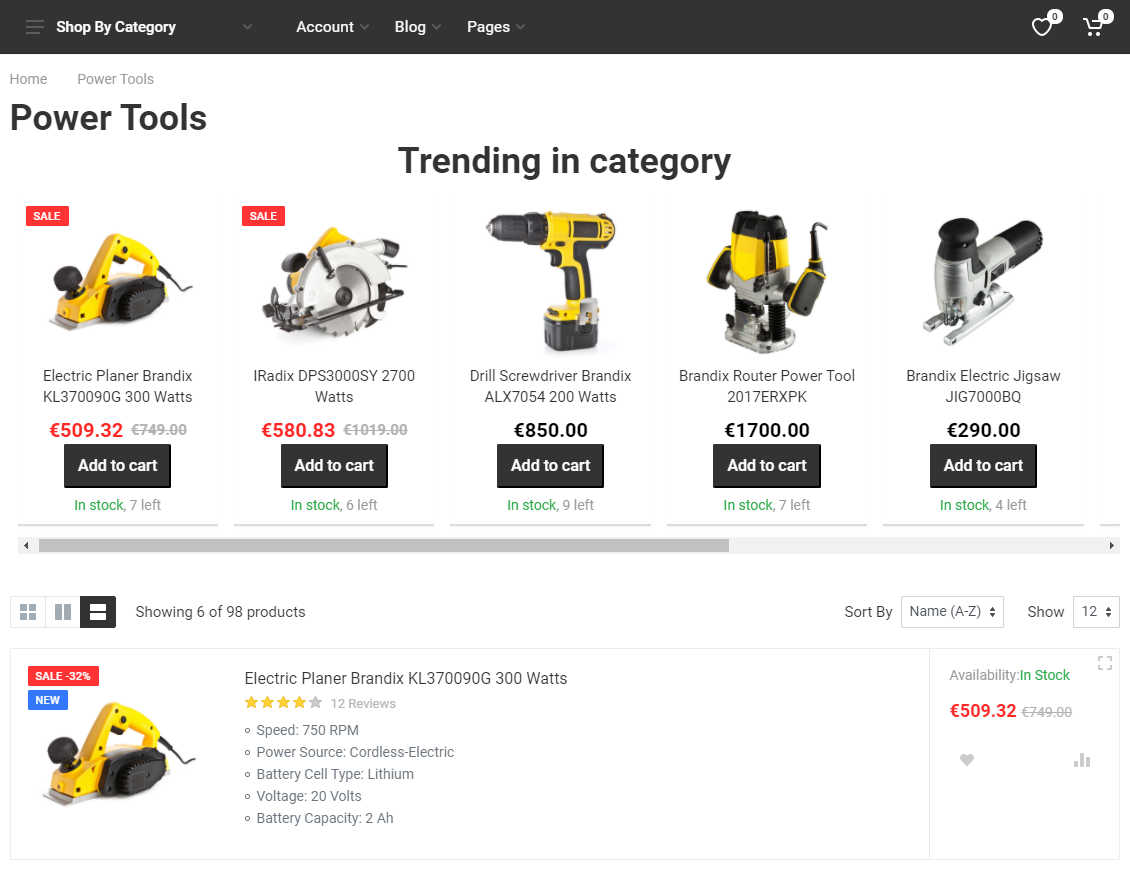
For generating the recommendation, this example relies on product data and transaction data collected from the site. The example therefore assumes that product and transaction tracking are correctly set up on the site. Moreover, the example assumes that the product tracking stores category information in the type attribute of a product.
If you're trying out this example on a production site, but do not want the example to interfere with production content, use either test mode or a workspace in creating the example. You can also safely preview the modification from the Control Panel.
To create the recommendation:
Creating and testing the recommendation strategy
The recommendation strategy returns up to 5 products most often viewed and up to 5 products most often purchased in a given category in the past 24 hours.
To create and test the recommendation strategy:
-
In the Frosmo Control Panel, in the sidebar, select More > Recommendations.
-
Click Create recommendation strategy.
-
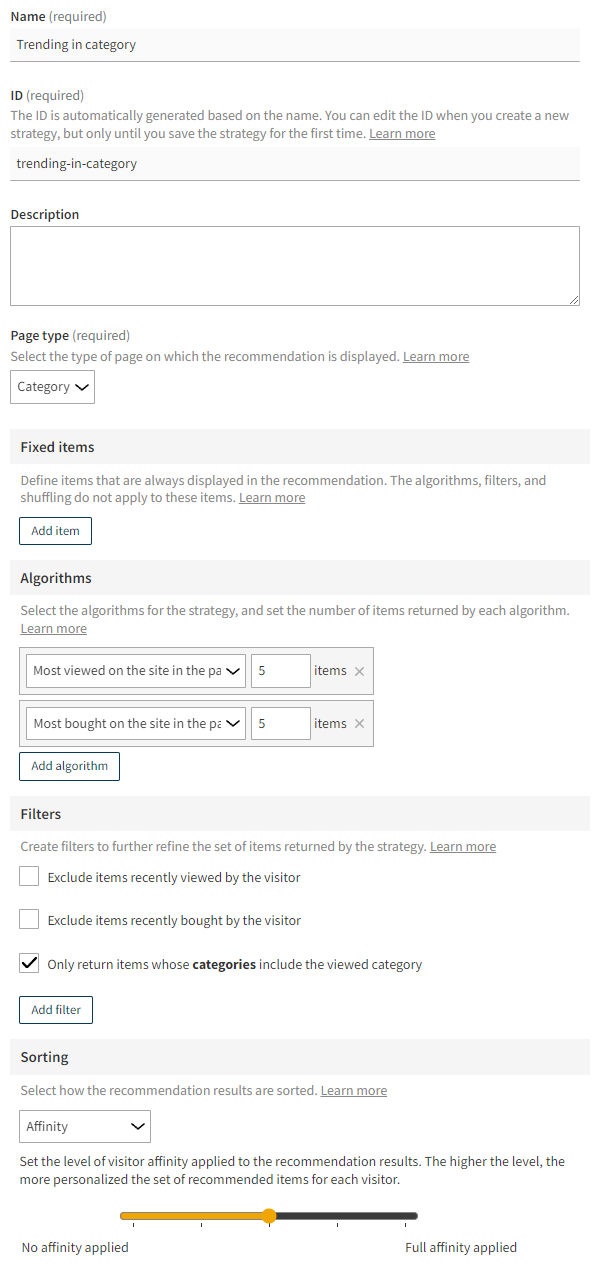
Define the following settings:
-
Name: Enter "Trending in category". Note that the ID automatically completes to "trending-in-category".
-
Page type: Select Category.
-
Algorithms: Select the following algorithms (in order):
-
Most viewed on the site in the past 24 hours, 5 items
-
Most bought on the site in the past 24 hours, 5 items
-
-
Filters: Select Only return items whose type matches the viewed category. This limits the recommended products to the category currently viewed by the visitor.
-
Sorting: Feel free to choose any option you want.
The following figure shows the complete recommendation strategy in the Control Panel. The strategy uses affinity at 50% for sorting the recommendation results. Click the figure to view a larger version.
For more information about the settings, see Creating and editing a recommendation strategy.
-
-
Click Save. The Frosmo Platform generates the recommendation data for the new strategy. The data generation may take several minutes.
-
In the Preview section, test the strategy by previewing the products it returns:
-
Optionally, in the Visitor ID field, enter the Frosmo ID of the visitor whose personalized recommendation you want to preview. If you leave the field empty, the preview shows the recommendation results without any affinity applied (assuming you're using affinity to sort the results).
-
In the Categories field, select and add the category whose recommended products you want to preview. The preview displays the recommended products in slot order, that is, in the order in which the items are recommended to visitors.
-
Check the preview to ensure the recommendation returns the correct products.
-
You have created and tested the recommendation strategy. You can now use its recommendation data in a modification.
Creating the recommendation slider template
The template creates a simple product recommendation slider. The template provides variation content options for defining the slider title, selecting the recommendation strategy to use, and selecting the maximum number of products to display in the slider. The template uses content prerendering to fetch and process the recommendation data before building and rendering the final slider element.
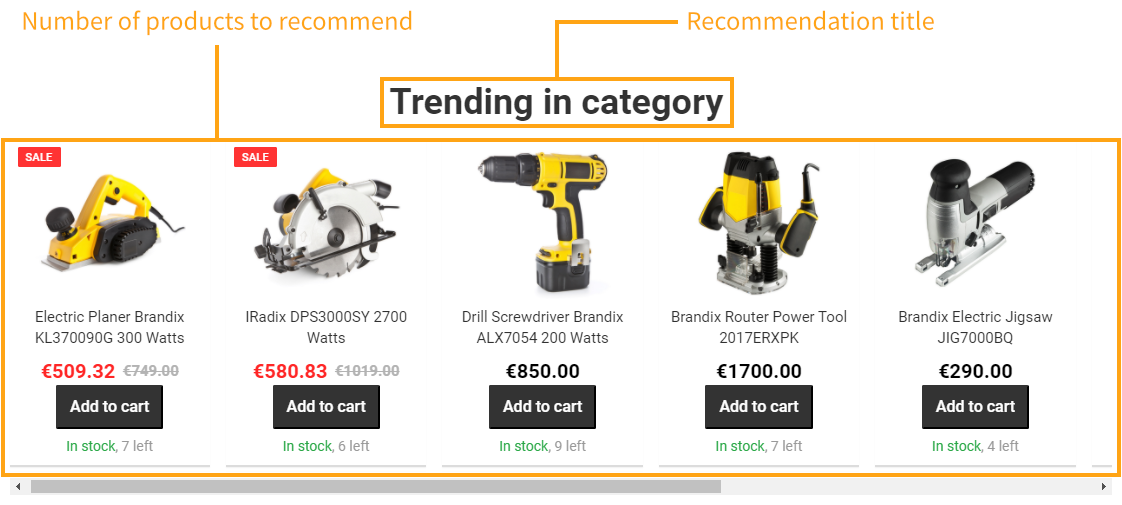
Figure: Customizable visual parts of the recommendation slider (click to enlarge)
To create the recommendation slider template:
-
In the Control Panel, in the sidebar, select Modifications.
-
Select the Templates tab.
-
Click Create template.
-
Define the following settings:
-
Name: Enter "Product recommendation slider".
-
Export content: Leave this field to Automatic.
-
Minified: Leave this to Enabled.
-
Content: Enter the following content for the template.
Content for the template<!-- HTML content of the modification -->
<div class="container">
<h1 class="reco-title">{{title}}</h1>
<div class="reco-slider">
<div class="reco-slider-products">
{{#products}}
<div class="reco-slider-product-container">
<a class="product" href="{{{attributes.url}}}" data-product-id="{{id}}">
<img alt="{{{name}}}" class="product-image" src="{{attributes.image}}" />
<div class="product-name">{{{name}}}</div>
<div class="product-price">{{attributes.price}} €</div>
</a>
</div>
{{/products}}
</div>
</div>
</div>
<!-- CSS for styling the HTML content of the modification -->
<style>
.reco-title {
text-align: center;
}
.reco-slider {
display: flex;
flex-direction: column;
margin-bottom: 20px;
width: 100%;
max-width: 100vw;
}
.reco-slider > * {
box-sizing: border-box;
}
.reco-slider-products {
display: flex;
overflow-x: scroll;
/* Scroll snap for browsers that support it */
scroll-snap-type: x mandatory;
/* Use momentum-based scrolling on wekbit */
-webkit-overflow-scrolling: touch;
}
.product {
display: flex;
flex-direction: column;
/* Product card spacing */
margin: 0.5em;
/* Product card padding */
padding: 0.5em;
background-color: white;
border: 0 none;
border-bottom: 2px solid #dcdcdc;
box-shadow: 0 1px 1px rgba(0,0,0,0.05);
/* Scroll snap for browsers that support it */
scroll-snap-align: start;
}
.product-image {
align-self: center;
object-fit: contain;
width: 100%;
max-width: 100%;
min-height: 10em;
max-height: 10em;
padding-bottom: 0.5em;
}
.product-name {
/* Webkit ellipsis (...) */
display: -webkit-box;
-webkit-line-clamp: 2;
-webkit-box-orient: vertical;
min-height: 2.8em;
max-height: 2.8em;
overflow: hidden;
color: #303030;
font-weight: bold;
line-height: 1.4em;
text-align: center;
}
.product-price {
color: #7a7a7a;
font-weight: bold;
font-size: 20px;
line-height: 1.4em;
text-align: center;
}
/* Responsive container */
.reco-slider-product-container {
/* Leave 3rd item as teaser */
min-width: 45%;
max-width: 45%; /* Force size even if 1 item */
}
@media (min-width: 700px) {
.reco-slider-product-container {
/* Leave 4th item as teaser */
min-width: 32%;
max-width: 32%;
}
}
@media (min-width: 850px) {
.reco-slider-product-container {
/* Leave 5th item as teaser */
min-width: 23.5%;
max-width: 23.5%;
}
}
@media (min-width: 1024px) {
.reco-slider-product-container {
/* Leave 6th item as teaser */
min-width: 19.5%;
max-width: 19.5%;
}
}
</style>The content defines the HTML and CSS code for the recommendation slider. The content includes multiple Mustache tags, which need to be replaced with specific values in the final rendered content.
Feel free to edit the content to adapt the slider to your site's layout and style.
-
Content prerenderer: Enter the following content prerenderer for the template.
Content prerenderer for the template/**
* Get the recommendation data, and render the recommendation with that data.
* @returns {void}
*/
function createRecommendation() {
// Get the recommendation strategy selected in the modification variation.
var strategy = templateInstance.options.strategy;
// Get the latest recommendation data generated with the selected strategy. Shuffle the results.
frosmo.easy.strategies.fetch(strategy, { shuffle: true })
// Extract the recommendation data from the response, and render the recommendation with the data.
.then(function (response) {
var data = response.data;
renderRecommendation(data);
})
.catch(function (error) {
console.error(error);
});
}
/**
* Render the recommendation.
* @param {string} data Recommendation data to render
* @returns {void}
*/
function renderRecommendation(data) {
// Build the content options for the template renderer.
// Restrict the number of products based on "numberOfProducts".
var options = {
title: templateInstance.options.title,
products: data.slice(0, templateInstance.options.numberOfProducts)
};
// Render the template content with the content options.
templateInstance.render(options);
}
createRecommendation();The content prerenderer:
-
Fetches the recommendation data by calling the
frosmo.easy.strategies.fetch()function. The first parameter of the function is the ID of the recommendation strategy to use, which the prerenderer gets from thestrategycontent option. The second parameter instructs the strategy to shuffle its results. For more information about the function, see Retrieving recommendation data for strategies. -
Builds the final content options with which to render the template content. These are the values for the Mustache tags in the content. The values include the recommendation title, which comes from the
titlecontent option set in the modification variation, and the final set of recommended products, which the prerenderer extracts from the recommendation data based on thenumberOfProductscontent option set in the modification variation. -
Renders the template content with the final content options.
-
-
Content options schema: Enter the following content options schema for the template.
Content options schema for the template{
"type": "object",
"title": "",
"properties": {
"title": {
"type": "string",
"title": "Recommendation title"
},
"strategy": {
"type": "string",
"title": "Recommendation strategy"
},
"numberOfProducts": {
"type": "integer",
"title": "Number of products to recommend",
"default": 5,
"minimum": 1,
"maximum": 10
}
},
"required": [
"title",
"strategy",
"numberOfProducts"
]
}The schema describes the following content options, which must be set in the content options UI of the modification variation:
-
Recommendation title (
title) -
Recommendation strategy (
strategy) -
Number of products to recommend (
numberOfProducts)
The template uses all three content options to create the final recommendation slider element. While the template content uses
titleas is, the content prerenderer usesstrategyandnumberOfProductsto produce the final set of recommended products with whose data the recommendation slider gets populated. -
-
Content options UI schema: To further customize the content options UI, enter the following content options UI schema for the template.
Content options UI schema for the template{
"title": {
"ui:placeholder": "Enter a display title for the recommendation"
},
"strategy": {
"ui:field": "RecommendationStrategySelector"
}
}The UI schema defines a placeholder text for the Recommendation title field and sets the Recommendation strategy field to be rendered as a
RecommendationStrategySelectorwidget.
The following figure shows the complete template in the Control Panel. Click the figure to view a larger version.

For more information about the settings, see Creating and editing a template.
-
-
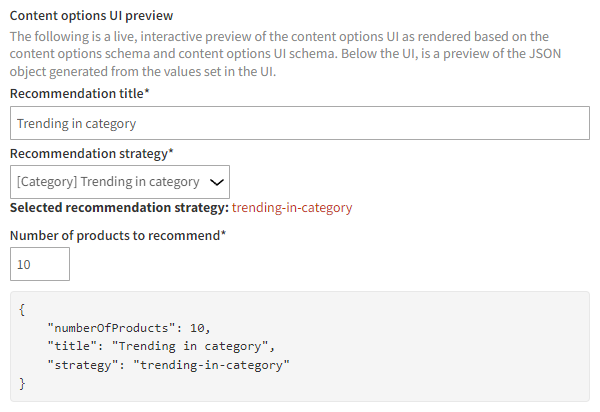
Use the content options UI preview at the bottom of the editor to test that the content options schema and content options UI schema are correctly defined.
The preview is fully interactive, so any changes you make to the schemas are automatically reflected in the preview. You can also set the content options in the preview as you would in the actual content options UI, and you can see a preview of the JSON object generated based on the set values.
The following figure shows the content options UI preview for template.
-
Click Save.
You have created the template. You can now use the template in a modification to display the template content.
Displaying the recommendation
When a visitor navigates to a product category page, they see a recommendation for up to 10 trending products in that category.
For example purposes, let's assume that a product category page can be identified by /category/ in the page URL, and that the page header is contained in a <div class="page-header"> element. You'll place the recommendation slider below the header on every category page.
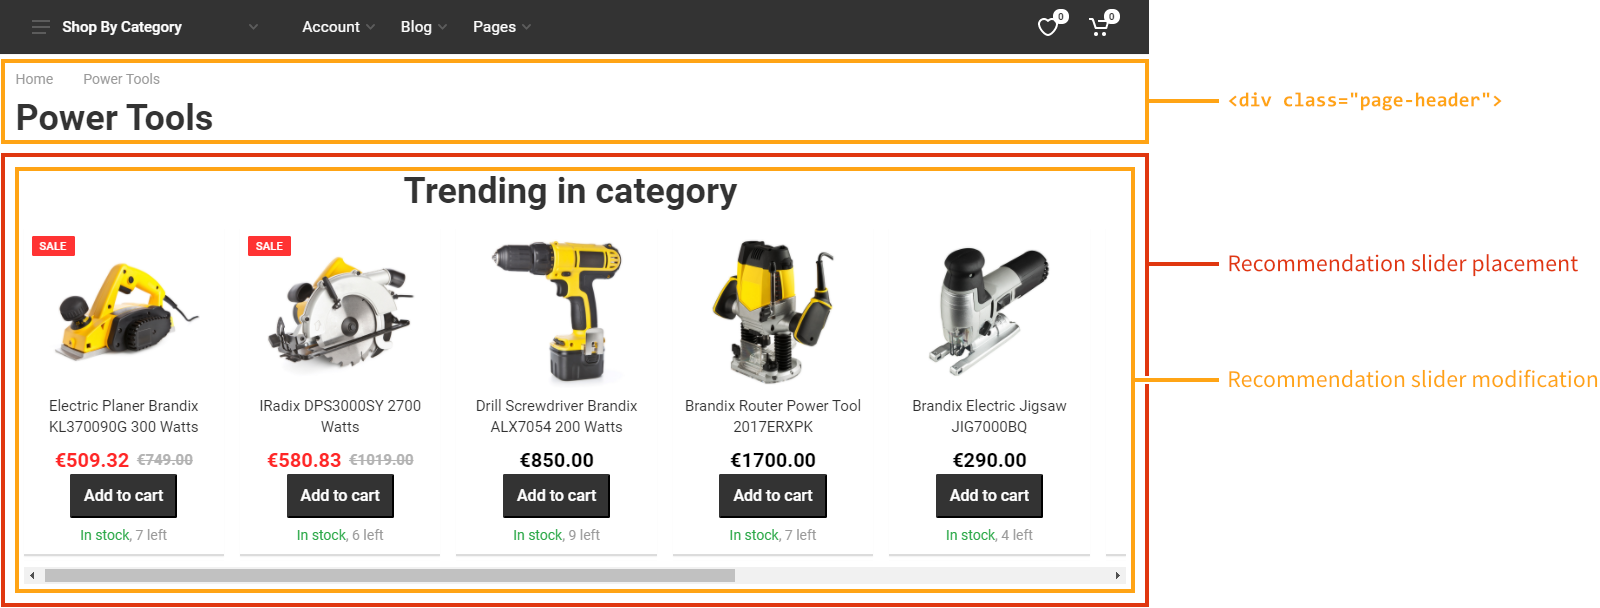
The URL scheme, content layout, and source code structure of a product category page on your site almost certainly differ from the above. You could also use a trigger instead of a URL matcher to identify category pages, and you might want to place the recommendation slider differently.
To display the recommendation:
Creating the recommendation slider placement
To create the recommendation slider placement:
-
In the Control Panel, on the Modifications page, select the Placements tab.
-
Click Create placement.
-
Define the following settings:
-
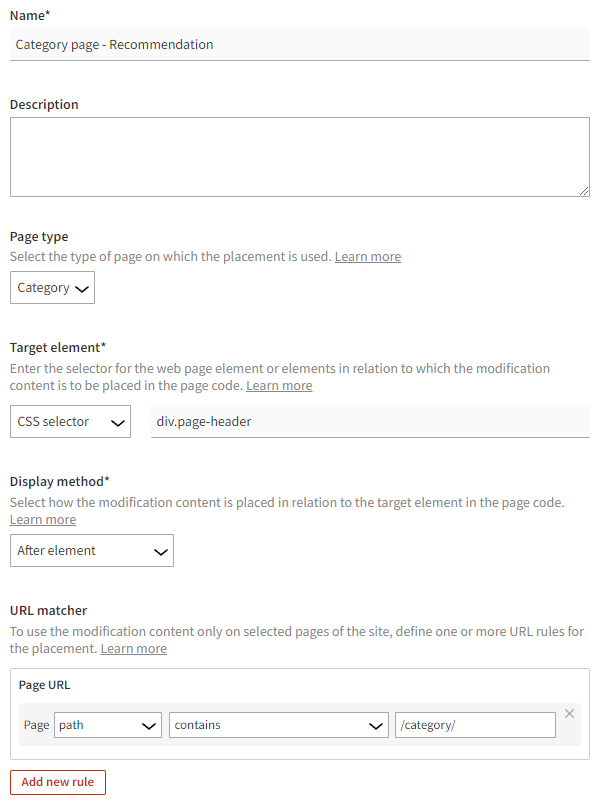
Name: Enter "Category page - Recommendation".
-
Page type: Select Category.
-
Target element: Select CSS selector, and enter "div.page-header" as the selector name.
-
Display method: Select After element.
-
URL matcher: Click Add new rule. Since only product page URLs contain
/category/in their path, define the following rule: Page path contains /category/. This means that the placement is valid for a page only when the page URL path contains "/category/".
The target element, display method, and URL matcher together place the modification below the page header on every product category page.
For more information about the settings, see Creating and editing a placement.
-
-
Click Save.
You have created the placement. You can now use the placement in a modification.
Creating the recommendation slider modification
To create and activate the recommendation slider modification:
-
In the Control Panel, on the Modifications page, select the Overview tab.
-
Click Create modification.
-
Enter "Category page - Recommendation - Trending in category" as the modification name, select Personalization as the modification case, and click Create.
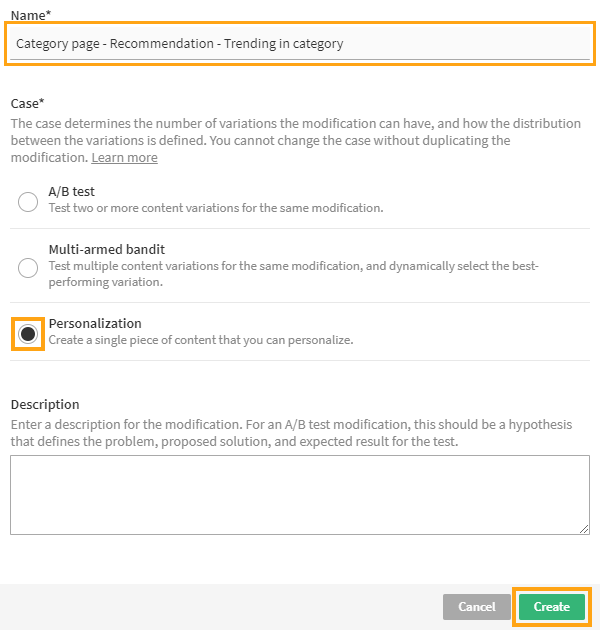
You could also select another case, but since this modification needs only the one variation, Personalization is the natural choice here.
For more information about the settings, see Creating and editing a modification.
-
Select the placement for the modification:
-
In the Basic settings view, in the Placement section, click Select placement.

-
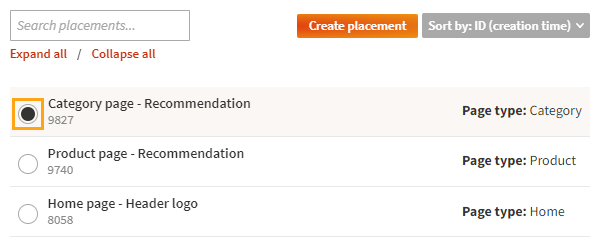
Select the placement you created for the recommendation slider.
-
Click Save.
For more information about the settings, see Defining the placement for a modification.
-
-
Define the content for the modification:
-
In the Basic settings view, in the Content section, click the variation name.

-
In the Variation settings section, click Select type.
-
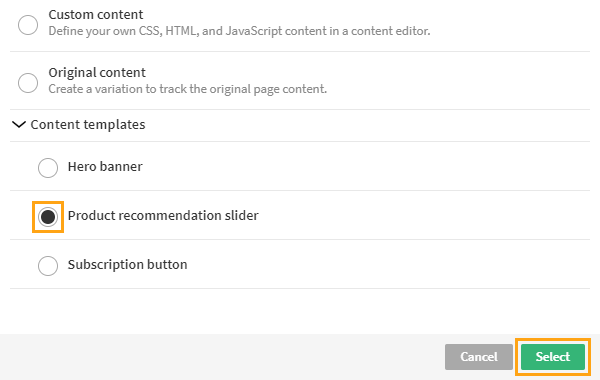
In the Content templates list, select the template you created for the recommendation slider, and click Select.
-
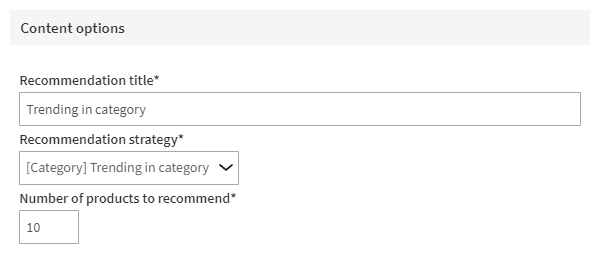
In the Content options section, define the content options. You must define Recommendation title, Recommendation strategy, and Number of products to recommend. Enter an appropriate title, select the strategy you created for trending products, and set the number of products to 10. Feel free to try out other values for the number of products.
-
At the bottom of the view, click Save.
-
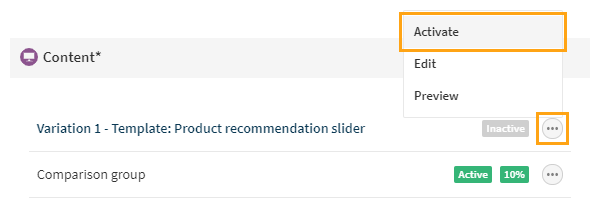
Back in the Content section, click the quick menu button for the variation, and select Activate.
-
If you want to disable the comparison group for the modification, click the quick menu button for the group, and select Deactivate.
For more information about the settings, see Defining the content for a modification.
-
-
Activate the modification:
-
At the bottom of the Basic settings view, click Activate.
-
To confirm, click Activate.
-
You have created and activated the modification. The recommendation is now live, and you're done with this example!