Visitor explorer
The visitor explorer view in the Frosmo Control Panel allows you to:
-
Browse the visitors tracked for the currently selected site. You can filter visitors by interaction statistics, such as the number of views and transactions, and by affinity group.
-
View an individual visitor's interaction profile. The profile includes information about the visitor's current affinities and their recent interactions on the site.
-
Preview recommendation, search, and Smart Discovery results for an individual visitor.
Use the visitor explorer to:
-
Study how individual real-world visitors have interacted with your site.
-
See what affinity profiles actually look like.
-
Preview how effectively the Frosmo Platform can personalize content for individual visitors.
If you cannot find the visitor explorer or view visitor profiles in the Frosmo Control Panel, contact Frosmo support.
Browsing visitors
The visitor explorer lists visitors by Frosmo ID.
A visitor's Frosmo ID cannot be used to identify the visitor's person unless the ID is coupled with user account data. By default, the Frosmo Platform does not track user account data or any other personal data. Even with sites where the platform does track personal data, that data is neither visible nor used in any way in the visitor explorer. For more information about how the platform tracks visitors, see Visitors and sessions.
To browse the visitors tracked for a site:
-
In the Frosmo Control Panel, in the sidebar, select Audiences.
-
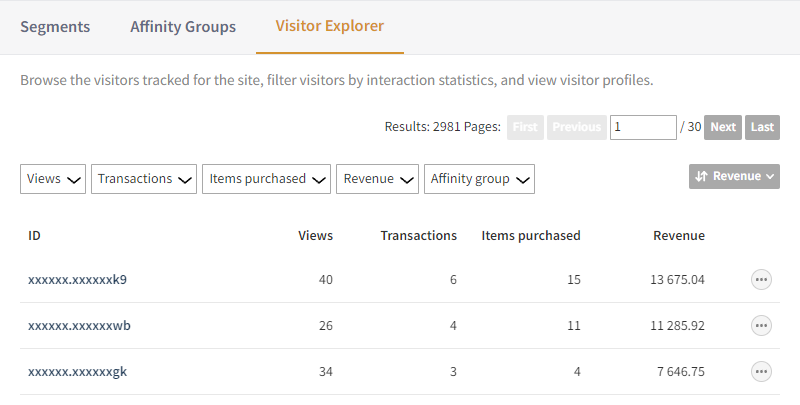
Select the Visitor Explorer tab. The Control Panel displays a paginated list of visitors tracked for the site.
The visitor explorer includes visitors and calculates their statistics based on the following criteria:
-
Include visitors and calculate their statistics from the past two calendar months.
-
Include the top 1 000 visitors with the most views and the top 1 000 visitors with the most transactions per calendar month.
-
Include only unique visitors.
For more information about the criteria, see Understanding visitor statistics.
-
-
To filter the list, select the filters you want to apply:
-
Views: Select the minimum number of views that a visitor must have accumulated.
-
Transactions: Select the minimum number of transactions that a visitor must have completed.
-
Items purchased: Select the minimum number of items that a visitor must have purchased. The number includes multiple units of the same item.
-
Revenue: Select the minimum amount of revenue that a visitor's transactions must have generated.
-
Affinity groups: Select one or more affinity groups to which a visitor must belong.
The Control Panel displays only visitors who match all the selected filters. (The Control Panel applies the filters with a logical AND operator.)

To clear a filter, click ✕ for the filter.

-
-
To navigate the list, use the page controls.

-
To sort the list, click the sort control, and select the sorting premise. You can sort the list in ascending or descending order by any of the visitor statistics included in the list. The default is in descending order by revenue.

-
Study the visitor statistics:
-
Views: Total number of views accumulated by the visitor.
-
Transactions: Total number of transactions completed by the visitor.
-
Items purchased: Total number of items purchased by the visitor. The number includes multiple units of the same item.
-
Revenue: Total amount of revenue generated by the visitor's transactions.

-
-
To view more information about a visitor, click the visitor ID. For more information, see Viewing a visitor profile
Viewing a visitor profile
A visitor profile includes information about the visitor's current affinities and their recent interactions on the site. You can also use the profile view to preview recommendation, search, and Smart Discovery results for the visitor, and compare how personalized and non-personalized results would differ for the visitor.
To view a visitor profile:
-
In the Frosmo Control Panel, in the sidebar, select Audiences.
-
Select the Visitor Explorer tab. The Control Panel displays a paginated list of visitors tracked for the site.
-
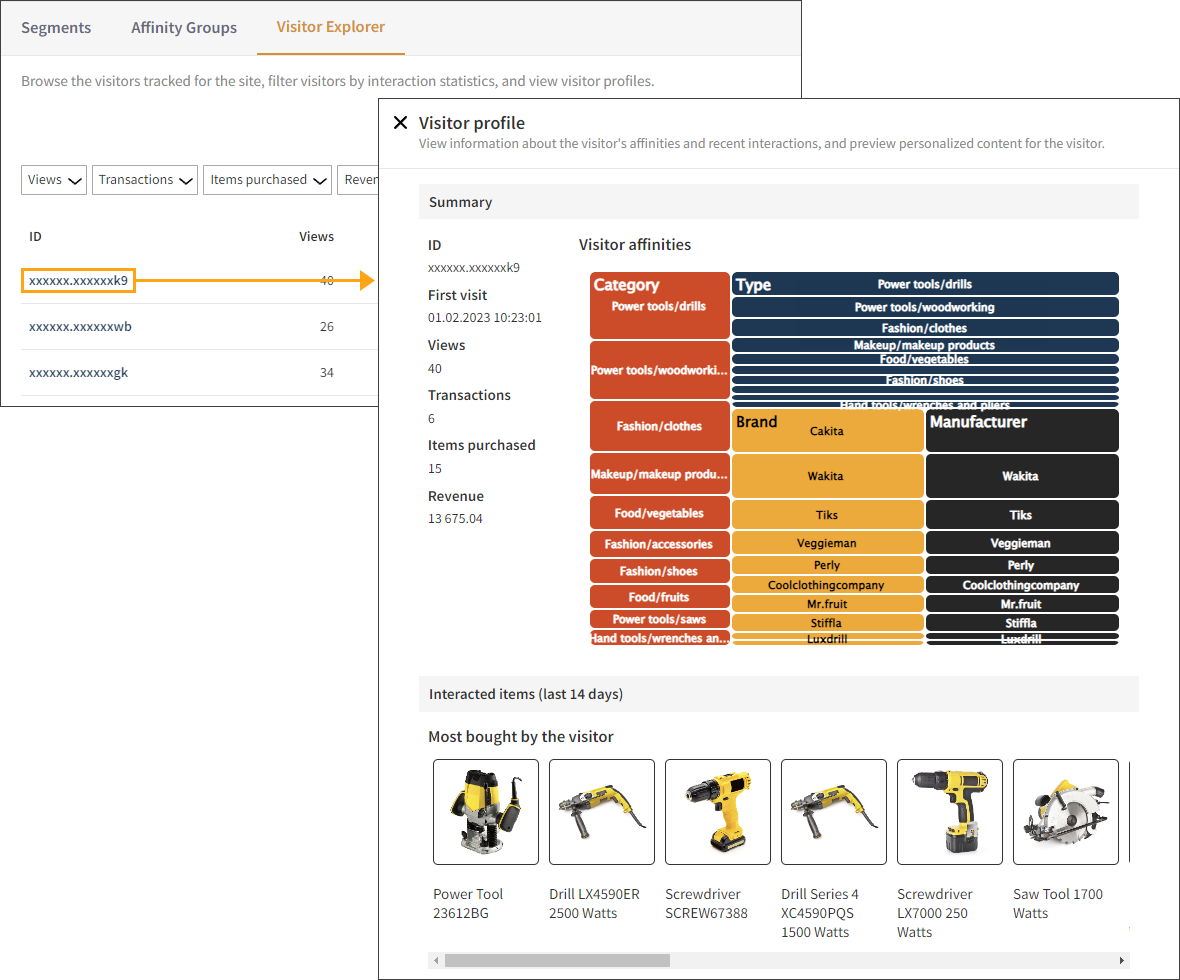
In the list, find the visitor whose profile you want to view, and click the visitor ID. The Control Panel displays the visitor profile in a separate modal.
-
Study the visitor profile:
-
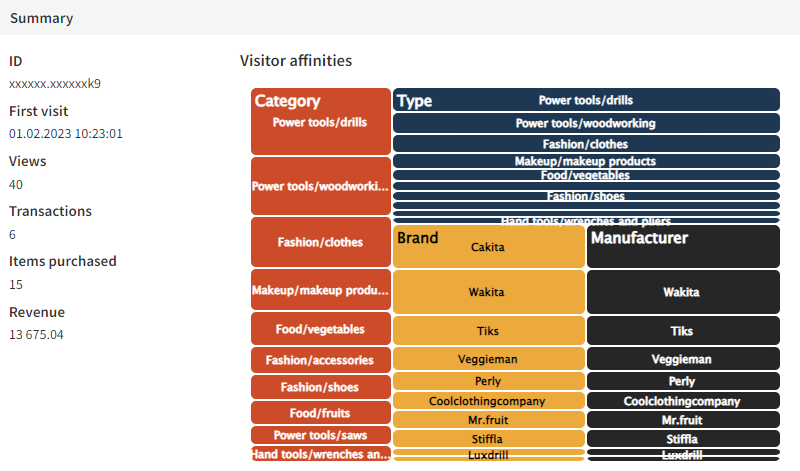
Summary: List of key visitor statistics (same as in the visitor list) and a visual representation of the visitor's current affinities. The bigger the box, the greater the affinity. To view the affinity scores, hover over the affinities. The scores are normalized to percentage values, with the highest affinity score for a given attribute set to 100%.
-
Interacted items: List of items with which the visitor has interacted in the past 60 days. The items are grouped by most bought, most viewed, recently bought, and recently viewed.

-
-
Preview recommendation, search, and Smart Discovery results for the visitor.
Previewing personalized content for a visitor
You can preview recommendation, search, and Smart Discovery results for an individual visitor. The preview allows you to compare how personalized and non-personalized results would differ for the visitor.
To preview personalized content for a visitor:
-
In the Frosmo Control Panel, in the sidebar, select Audiences.
-
Select the Visitor Explorer tab. The Control Panel displays a paginated list of visitors tracked for the site.
-
In the list, find the visitor whose personalized content you want to preview, and click the visitor ID. The Control Panel displays the visitor profile in a separate modal.
-
At the bottom, in the Preview section, preview the content:
-
To preview recommendations, select Recommendations. For more information, see Previewing recommendations.
-
To preview search results, select Search. For more information, see Previewing search results.
-
To preview Smart Discoveries, select Smart Discovery. For more information, see Previewing Smart Discoveries.
-
Previewing recommendations
To preview a recommendation:
-
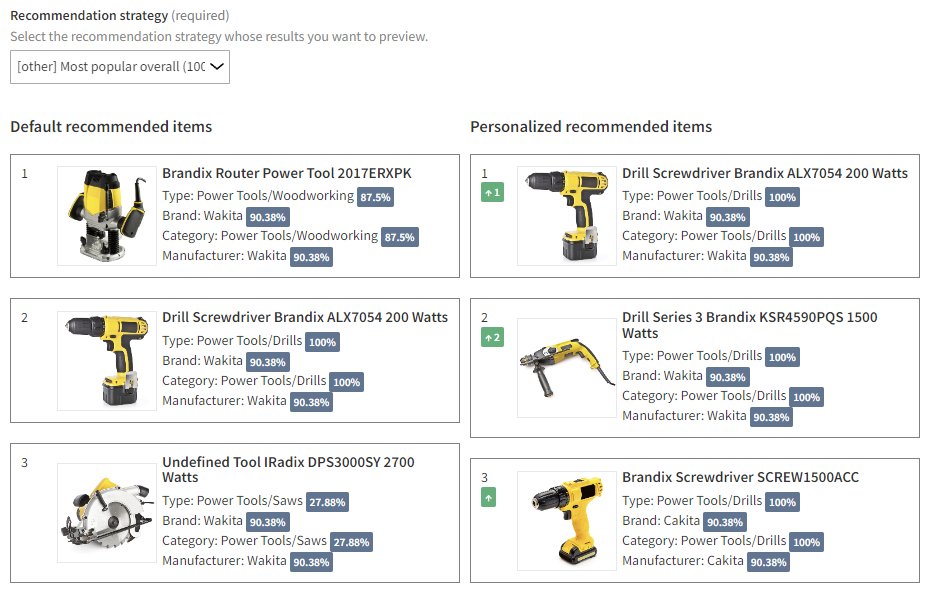
Select the recommendation strategy whose results you want to preview.
-
Depending on the page type of the recommendation strategy you selected, define the appropriate information for generating the recommendation:
-
Brand: Define the brand whose page you want to simulate. To define the brand, start typing its name in the field, and select the brand from the autocomplete list.
-
Cart items: Define one or more items to simulate the shopping cart contents. To define an item, start typing its ID or name in the field, select the item from the autocomplete list, and click Add.
-
Categories: Define one or more categories to simulate a category page. These are the categories whose items are shown on the simulated category page. To define a category, start typing its name in the field, select the category from the autocomplete list, and click Add.
-
Item: Define the item whose page you want to simulate. To define the item, start typing its ID or name in the field, and select the item from the autocomplete list.
-
Search results: Define one or more items and/or categories to simulate the search results. The former represent the matches returned by the search, while the latter represent the categories to which the returned items belong. To define an item, start typing its ID or name in the item field, select the item from the autocomplete list, and click Add. To define a category, start typing its name in the category field, select the category from the autocomplete list, and click Add.
The Control Panel displays two previews:
-
Default recommended items: Recommendation results without any personalization applied.
-
Personalized recommended items: Recommendation results with personalization applied. The personalization is whatever is defined in the selected recommendation strategy. If the recommendation strategy does not apply any personalization, the results are not personalized and are therefore identical to the default results.
-
For more information about how recommendations work in the Frosmo Platform, see Feature: Recommendation.
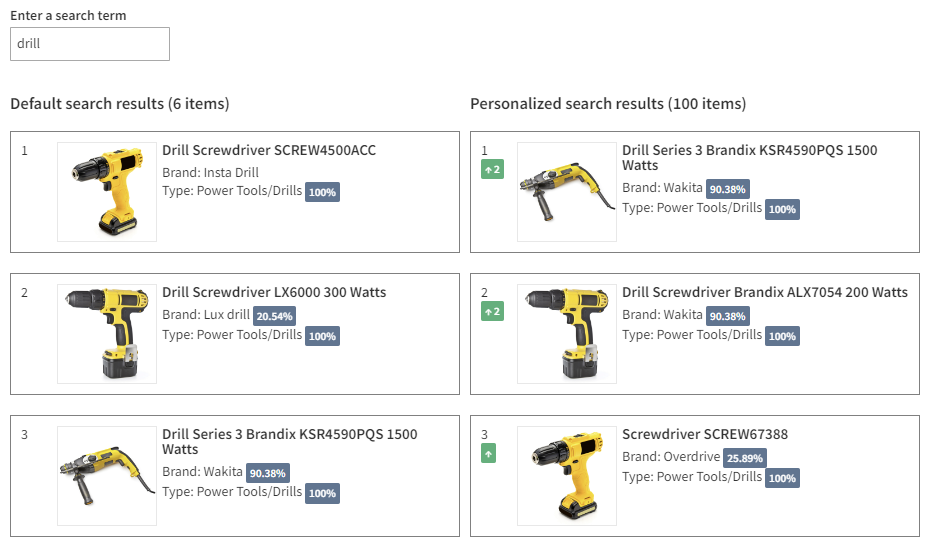
Previewing search results
To preview search results: In the search box, enter a search term.
The search results update instantly and dynamically with matching items. The attributes that the search checks for matches depend on the target attributes defined for the site.
The Control Panel displays two previews:
-
Default search results: Search results without affinity applied.
-
Personalized search results: Search results with affinity applied.
For more information about how search works in the Frosmo Platform, see Feature: Search.
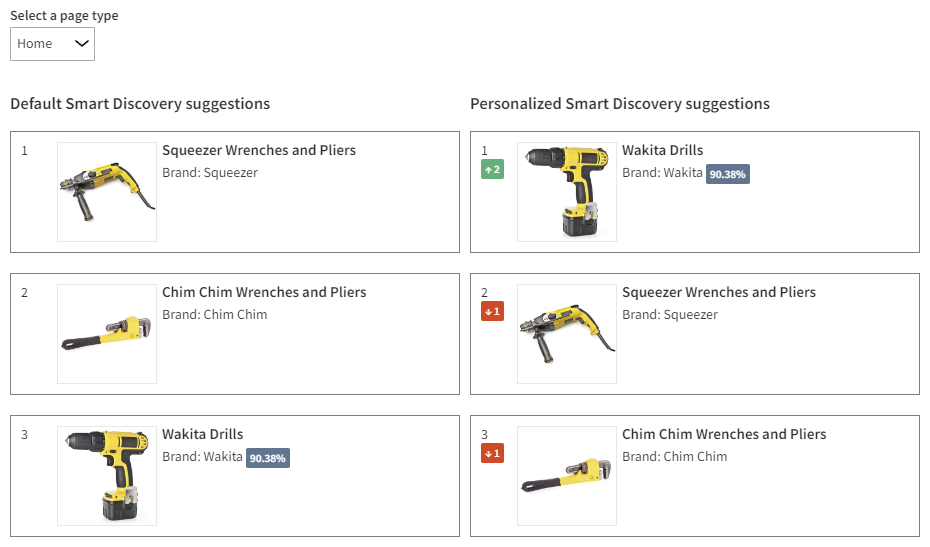
Previewing Smart Discoveries
To preview a Smart Discovery:
-
Select the page type whose Smart Discoveries you want to preview.
noteThe available page types depend on which page types are enabled for Smart Discovery.
-
If you selected Brand or Category as the page type, select the specific brand or category whose Smart Discovery you want to preview.
The Control Panel displays two previews:
-
Default Smart Discovery collections: Smart Discovery without affinity applied.
-
Personalized Smart Discovery collections: Smart Discovery with affinity applied.
For more information about how Smart Discovery works in the Frosmo Platform, see Feature: Smart Discovery.
Understanding visitor statistics
How does the visitor explorer choose which visitors to include in the list?
The visitor explorer includes visitors and calculates their statistics based on the following criteria:
-
Include visitors and calculate their statistics from the past two calendar months, excluding the current day. If the current day is the 1st of the month, take the preceding two calendar months. Otherwise, take the preceding month and the current month up to and including the preceding day.
-
Include the top 1 000 visitors with the most views and the top 1 000 visitors with the most transactions per calendar month, meaning a maximum of 4 000 visitors for two months.
-
Include only unique visitors. If the same visitor is in multiple top 1 000 groups, include the visitor only once.
For example, if the current day is:
-
October 1: The visitor explorer lists the top visitors and their statistics from August 1 through September 30.
-
October 8: The visitor explorer lists the top visitors and their statistics from September 1 through October 7.
-
October 1: If a visitor is in a top 1 000 group for August or September, the visitor is included in the list.
-
October 1: If a visitor is in a top 1 000 group for July but not for August or September, the visitor is not included in the list.
-
October 8: If a visitor is in a top 1 000 group for August but not for September or October, the visitor is not included in the list.
-
October 1: If a visitor is in a top 1 000 group for August and in a top 1 000 group for September, the visitor is included in the list, but only once.
How can a visitor have completed one or more transactions but generated 0 revenue?
The transactions the visitor has completed have generated 0 revenue because their total purchase values sum up to 0. This can happen in the following cases:
-
The total purchase value of each transaction is 0.
-
The total purchase value of one or more transactions is negative, and the sum total of negative values exactly matches the sum total of positive values.