Creating and editing a placement
Learn how to create and edit a placement, and define the settings for the placement.
Creating a placement
You can also create a placement as part of the modification workflow. For more information, see the Defining the placement for a modification.
To create a placement:
-
In the Frosmo Control Panel, in the sidebar, select Modifications.
-
Select the Placements tab.
-
Click Create placement.
-
Define the placement settings.
-
When you're done, click Save.
Editing a placement
To edit a placement:
-
In the Frosmo Control Panel, in the sidebar, select Modifications.
-
Select the Placements tab.
-
In the placements list, find the placement you want to edit, and click the placement name.
-
Edit the placement settings.
-
When you're done, click Save.
You can also check in which modifications the placement is currently used.
Placement settings
The following table describes the settings you can define for a placement in the Frosmo Control Panel.
| Setting | Description | Role |
|---|---|---|
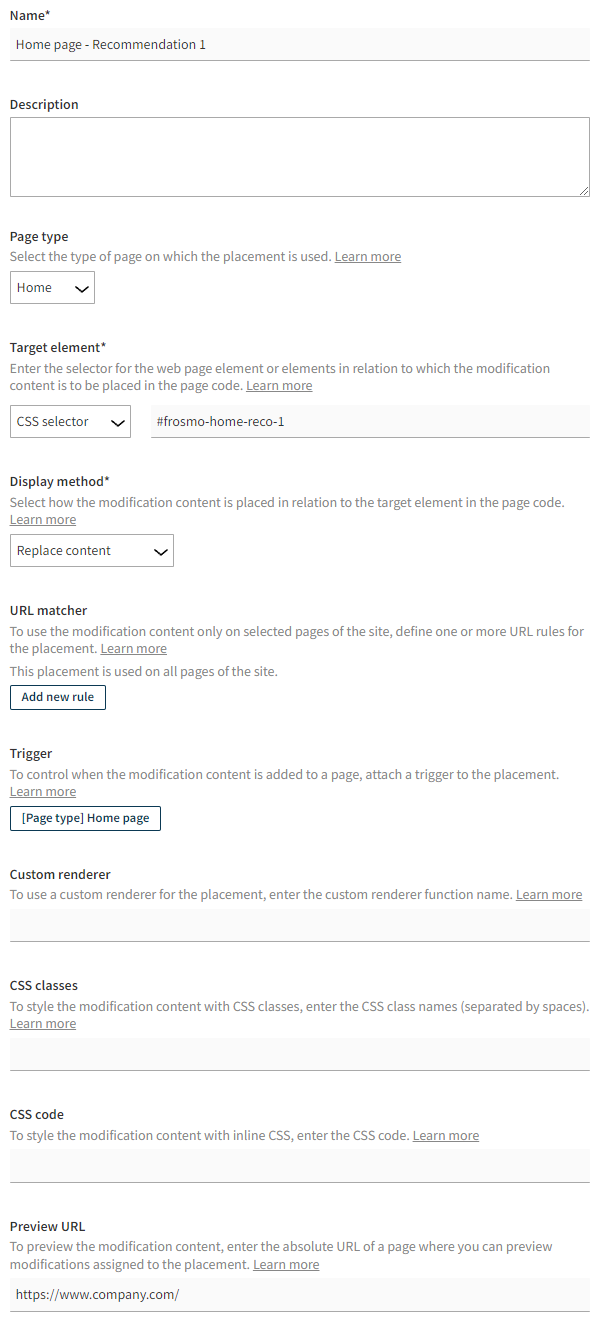
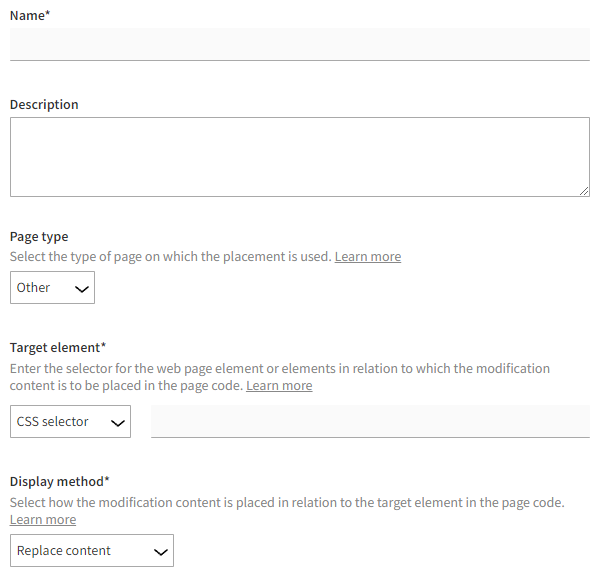
Name | Enter a name for the placement. tip To easily identify your placements, use a consistent naming syntax that produces descriptive names. For example, Frosmo uses the following syntax: <Page type> - <Content type> - <Extra identifier if any> The first part identifies the page or pages for which the placement is valid. If the placement is valid for multiple pages, the Frosmo convention is to name the first part "All pages". For example:
| Required |
Description | Enter a description for the placement. You can use the description to, for example, explain how and where the placement is placed and why. | Optional |
Page type | Select the type of page on which the placement is used. The page types available for your site depend on the site's vertical. If the placement is used on multiple types of pages, select Other. note The page type does not affect on which pages the platform adds the placement (and thereby modifications assigned to the placement). However, the page type should nonetheless match the placement's targeting settings: Target element and URL matcher. For example, if the placement is intended to be used on the site home page, and you define a URL rule that adds the placement only to the site home page, make sure you select Home as the page type. The page type information is used to calculate the business performance statistics for the site. The statistics for each page type are based on placement settings, so in order to get relevant statistical data, selecting the correct page type for each placement is essential. | Required |
Target element | Define the web page element or elements in relation to which the placement and thereby the modification content are to be placed in the page code. To define the element:
Here are a few example CSS selectors:
| Required |
Display method | Select how the placement and thereby the modification content are placed in relation to the target element in the page code:
| Required |
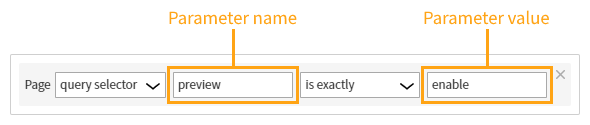
URL matcher | If you do not want to add the placement and thereby the modification to every page of your site, create one or more URL rules that together resolve into the set of pages where you want to use the placement. A URL rule defines a comparison between a part of the URL and a string value that you expect that part to match. For example, you might check whether the protocol part of the URL matches "http" or "https". If you define no URL rules, the placement is valid for all pages of your site (unless you select a trigger for the placement that only fires on specific URLs). Any modification that uses the placement is therefore potentially used on every page of the site. To create a new rule:
You have the following options for selecting the part of the URL:
tip For more information about the URL syntax and its components, see Wikipedia. If you create multiple rules, select how you want to combine the rules:
You can create as many rules as you need. | Optional |
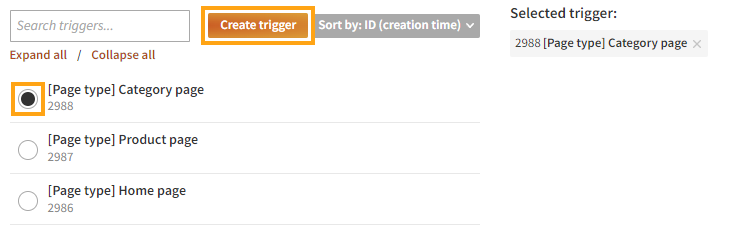
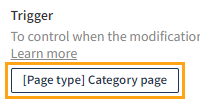
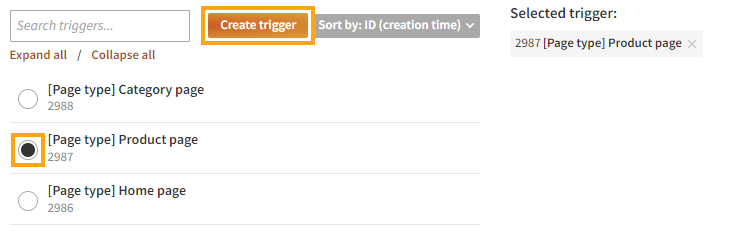
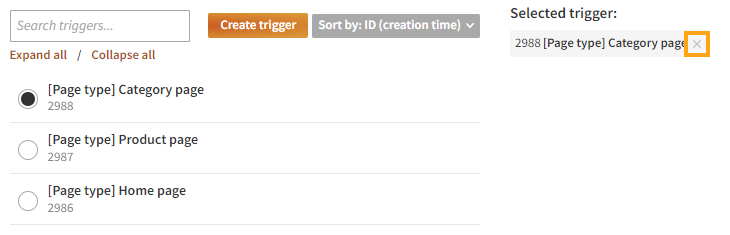
Trigger | If you want to control when the placement and thereby the modification content get added to a page, select a trigger for the placement. With a trigger, the placement is added to the page only when the trigger fires. You can only select a single trigger, but you can freely change the selected trigger, and you can remove the trigger if you no longer need it. note Be careful when using a trigger with the Hide & replace original display method, since the trigger is only evaluated after the target element is hidden. This may cause visitors to miss important content. If you define both a URL matcher and a trigger, the placement is added only to pages that match the URL rules and only when the trigger gets fired. For example, if you define a URL rule that matches the path note If you define both a URL matcher and a trigger, make sure their URL rules do not conflict. Having conflicting URL rules can easily lead to a situation where the modification content is never added to a page. Selecting a triggerTo select a trigger:
Changing the triggerTo change the selected trigger:
Removing the triggerTo remove the selected trigger:
| Optional |
Custom renderer | Enter the name (without the namespace) of the custom renderer function that you want to use for this placement. You can use a custom renderer to change default placement functionality or add new functionality. The maximum length of the function name is 64 characters. note Only Frosmo customer teams can create custom renderers. For more information, contact Frosmo support. | Optional |
CSS classes | Enter the names of the CSS classes that you want to use to style the placement and thereby the modification content. If you use multiple classes, separate the names by spaces. note The classes must be defined in the site source code or in the modification content. The maximum length of the string of class names is 256 characters. Example: Single class Example: Multiple classes The class names are added to the | Optional |
CSS code | Enter the inline CSS code that you want to use to style the placement and thereby the modification content. The maximum length of the code is 255 characters. Example The code is added to the | Optional |
Preview URL | Enter the absolute URL of a page where you can preview modifications assigned to the placement. If you've defined URL rules for the placement, the preview URL must match those rules, meaning the placement must be valid for the page designated by the preview URL. The Control Panel uses the preview URL for launching variation previews from the modification UI. note If you want to use the variation preview function, you must define a preview URL for the placement used by the modification. tip If the placement is valid only for a single page, use the URL of that page as the preview URL. | Optional |