Example: Creating a Smart Discovery template
This example shows you how to create a slider template for a Smart Discovery.
Creating the template involves:
-
Building a slider web page element for the Smart Discovery. The element code uses Mustache variables for dynamically populating the slider with Smart Discovery data.
-
Fetching the Smart Discovery data for the page the visitor is currently viewing. You use the Frosmo Core fetch function for Smart Discoveries for fetching the data.
-
Defining content options for setting the display title and strategy of the Smart Discovery.
You create the template in the Frosmo Control Panel.
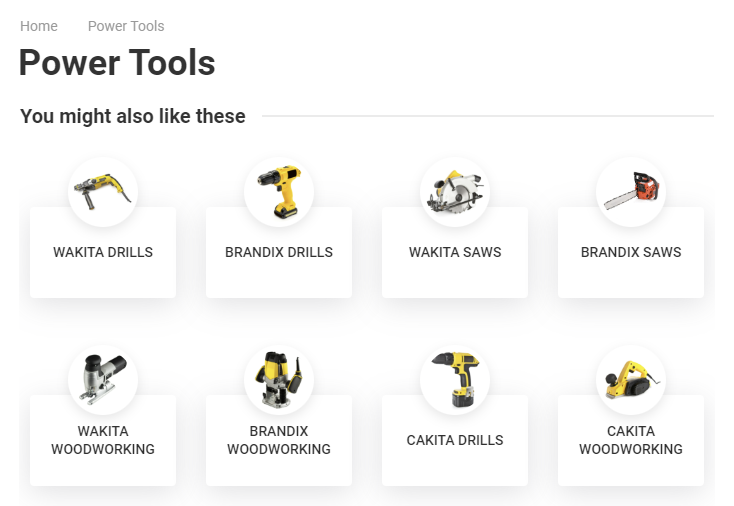
The following figure shows an example of the Smart Discovery slider on a category page.
This example assumes that the Smart Discovery feature is correctly set up on the site, and that the Frosmo Platform has generated the Smart Discovery data for categories.
If you're trying out this example on a production site, but do not want the example to interfere with production content, use a workspace.
To create the Smart Discovery slider template:
-
In the Frosmo Control Panel, in the sidebar, select Modifications.
-
Select the Templates tab.
-
Click Create template.
-
Define the following settings:
-
Name: Enter "Smart Discovery slider".
-
Export content: Leave this field to Automatic.
-
Minified: Leave this field to Enabled.
-
Content type: Select Smart Discovery.
-
Content: Enter the following content for the template.
Content for the template<div class="smart-discovery">
<div class="smart-discovery-header">
<h3 class="smart-discovery-header-title">{{title}}</h3>
<div class="smart-discovery-header-divider"></div>
<button class="smart-discovery-toggle-button">View all</button>
</div>
<div class="smart-discovery-container">
<div class="smart-discovery-collections">
{{#collections}}
<div class="smart-discovery-collection-container">
<a class="smart-discovery-collection" href="{{url}}" data-product-id="{{id}}">
<img alt="{{title}}" class="smart-discovery-collection-image" src="{{image}}" loading="lazy" />
<div class="smart-discovery-collection-name-container">
<div class="smart-discovery-collection-name">{{title}}</div>
</div>
</a>
</div>
{{/collections}}
</div>
</div>
</div>
<style>
.smart-discovery {
display: flex;
flex-direction: column;
margin: 20px 0px;
}
.smart-discovery-header {
display: flex;
align-items: center;
margin-bottom: 18px;
}
.smart-discovery-header-title {
margin-bottom: 0;
font-size: 20px;
}
.smart-discovery-header-divider {
flex-grow: 1;
height: 2px;
background: #ebebeb;
}
.smart-discovery-header-title+.smart-discovery-header-divider {
margin-left: 16px;
}
.smart-discovery-toggle-button {
border: none;
background: transparent;
}
.smart-discovery-toggle-button:hover {
font-weight: 500;
}
.smart-discovery-container {
position: relative;
height: fit-content;
}
.smart-discovery-collections {
margin: auto;
display: grid;
grid-gap: .75rem 0.5rem;
grid-template-columns: repeat(4, 1fr);
overflow: hidden;
max-height: 370px;
}
.smart-discovery-collection-container {
width: 100%;
}
.smart-discovery-collection-container:hover .smart-discovery-collection .smart-discovery-collection-name-container {
border: 1px solid #F08C04;
text-decoration: none;
}
.smart-discovery-collection-container:hover .smart-discovery-collection .smart-discovery-collection-image {
border: 1px solid #F08C04;
text-decoration: none;
}
.smart-discovery-collection {
position: relative;
margin: 0.5em;
padding: 0.2em;
display: flex;
flex-direction: column;
align-items: center;
background-color: white;
text-decoration: none;
scroll-snap-align: start;
height: 10em;
}
.smart-discovery-collection:hover {
opacity: .8;
text-decoration: underline;
text-decoration-color: black;
}
.smart-discovery-collection:visited {
text-decoration: underline;
text-decoration-color: #fff;
}
.smart-discovery-collection-image {
padding: 5px;
object-fit: contain;
height: 70px;
background: #fff;
border-radius: 100px;
margin-bottom: -20px;
z-index: 99;
box-shadow: rgba(0, 0, 0, 0.1) 0px 4px 12px;
min-width: 25%;
}
.smart-discovery-collection-name-container {
display: flex;
justify-content: center;
align-content: center;
height: 7em;
font-weight: 400;
font-size: 13px;
color: #303030;
box-shadow: rgba(100, 100, 111, 0.2) 0px 7px 29px 0px;
width: 100%;
line-height: 1.4em;
overflow: hidden;
-webkit-line-clamp: 2;
-webkit-box-orient: vertical;
text-transform: uppercase;
font-weight: 700;
border-radius: 4px;
}
.smart-discovery-collection-name-container:hover {
box-shadow: 1.4px 1.4px 1.4px 1.4px rgba(0, 0, 0, 0.1);
}
.smart-discovery-collection-name {
align-self: center;
margin: 5px;
text-align: center;
font-size: 14px;
font-weight: 500;
}
</style>
<script>
const toggleButton = document.querySelector('.smart-discovery-toggle-button');
const collections = document.querySelector('.smart-discovery-collections');
const defaultHeight = collections.scrollHeight;
const collapsedHeight = defaultHeight < 370 ? `${defaultHeight}px` : '370px';
toggleButton.style.display = defaultHeight < 370 ? 'none' : 'block';
toggleButton.addEventListener('click', () => {
if (collections.style.maxHeight === collapsedHeight || collections.style.maxHeight === '') {
collections.style.maxHeight = 'fit-content';
toggleButton.textContent = 'Collapse all';
} else {
collections.style.maxHeight = collapsedHeight;
toggleButton.textContent = 'View all';
}
});
</script>The content defines the HTML and CSS code for the slider. The HTML includes multiple Mustache tags, which need to be replaced with specific values in the final rendered content. The content also defines some JavaScript for handling the slider controls.
Feel free to edit the content to adapt the slider to your site's layout, style, and functionality.
-
Content prerenderer: Enter the following content prerenderer for the template.
Content prerenderer for the template// Fetch the data for a Smart Discovery strategy.
// If successful, render the Smart Discovery web page element.
frosmo.easy.smartDiscovery.fetch(templateInstance.options.strategy)
.then(renderSmartDiscovery)
.catch(error => frosmo.easy.console.error(error));
/**
* Render the Smart Discovery web page element.
*
* @param {Object} response Smart Discovery data to render
* @returns {void}
*/
function renderSmartDiscovery(response) {
const collections = response.data[0].items.map((collection) => {
// Build the search results page URL for the collection based on the collection's facets.
// The facets are the attributes (and their values) on which the collection is based, such as brand & category for "Nike Shoes".
// In this example, the URL syntax is "/search?attribute1=value&attribute2=value...".
// @todo Update this for your site's URL syntax.
// Build the URL query parameters from the facets.
const queryParams = Object.entries(collection.facets).map(([key, value]) => `${encodeURIComponent(key)}=${encodeURIComponent(value)}`).join('&');
// Build the URL and added it to the collection's data.
collection.url = '/search?' + queryParams;
return collection;
});
const options = {
collections: collections,
title: templateInstance.options.title
};
// Render the template content with the content options.
templateInstance.render(options);
}The content prerenderer:
-
Fetches the Smart Discovery data by calling the
frosmo.easy.smartDiscovery.fetch()function. -
Builds the final content options with which to render the template content. These are the values for the Mustache tags in the content. The values include the Smart Discovery title, which comes from the
titlecontent option set in the modification variation, and the details of the Smart Discovery collections, which the prerenderer extracts from the fetched data. The prerenderer uses thefacetsof a collection to build the search results page URL for the collection. -
Renders the template content with the final content options.
noteThis example was designed to work on the Frosmo retail demo site. When trying out the example on your own site, check and update at least the prerenderer code tagged with a
@todocomment. -
-
Content options schema: Enter the following content options schema for the template.
Content options schema for the template{
"type": "object",
"properties": {
"title": {
"type": "string",
"title": "Smart Discovery title"
},
"strategy": {
"type": "string",
"title": "Smart Discovery strategy"
}
},
"required": [
"title",
"strategy"
]
}The schema describes the following content options, which must be set in the content options UI of the modification variation:
-
Smart Discovery title (
title) -
Smart Discovery strategy (
strategy)
The template uses the content option values to create the final slider element.
-
-
Content options UI schema: To further customize the content options UI, enter the following content options UI schema for the template.
Content options UI schema for the template{
"title": {
"ui:placeholder": "Enter a display title for the Smart Discovery"
},
"strategy": {
"ui:field": "SmartDiscoveryStrategySelector"
}
}The UI schema defines a placeholder text for the Smart Discovery title field and sets the Smart Discovery strategy field to be rendered as a
SmartDiscoveryStrategySelectorwidget.
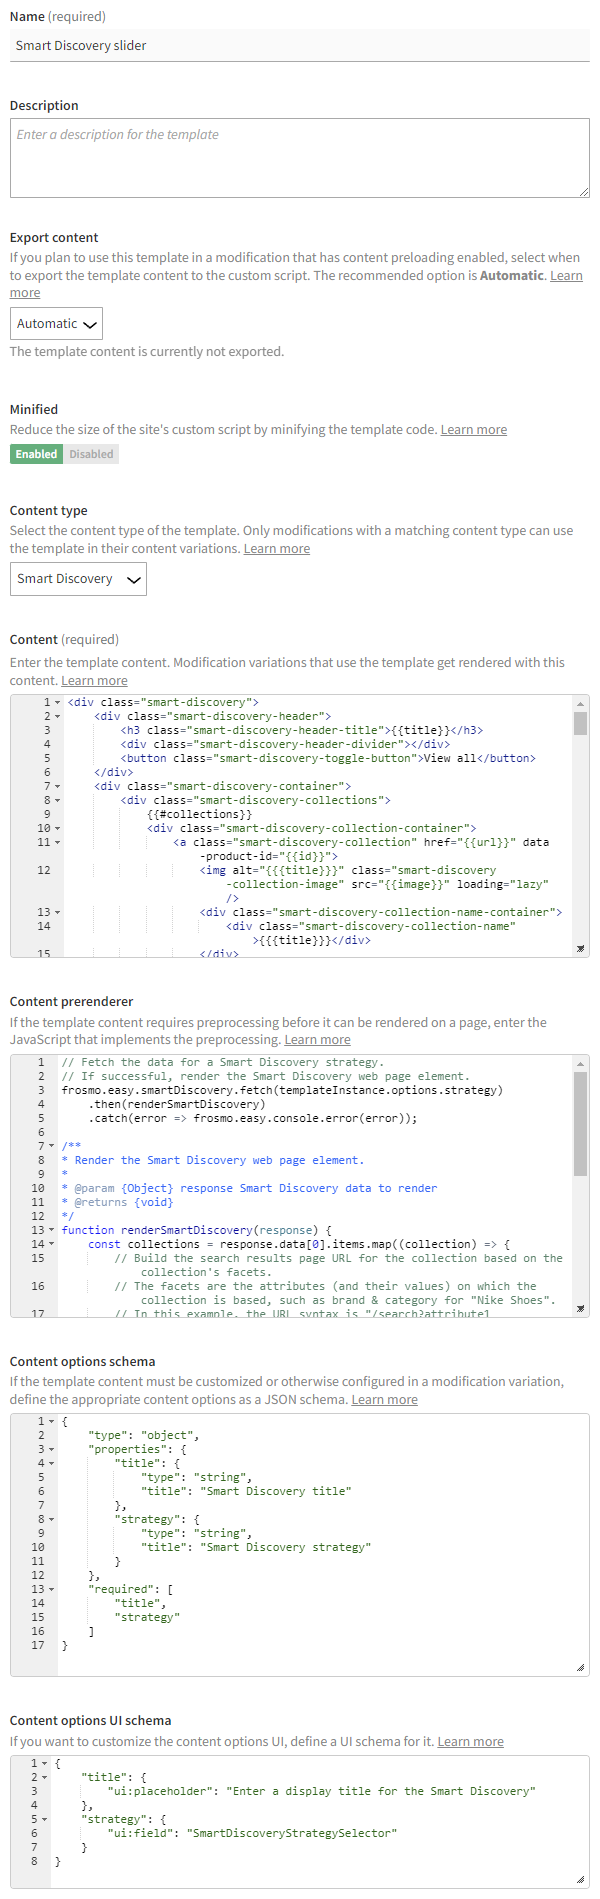
The following figure shows the complete template in the Control Panel. Click the figure to view a larger version.
For more information about the template settings, see Creating and editing a template.
-
-
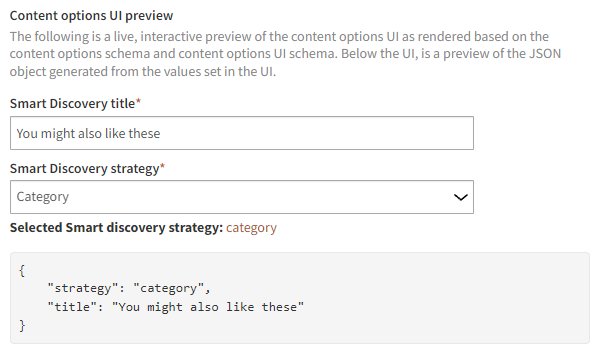
Use the Content options UI preview at the bottom of the editor to test that the content options schema and content options UI schema are correctly defined.
The preview is fully interactive, so any changes you make to the schemas are automatically reflected in the preview. You can also set the content option in the preview as you would in the actual content options UI, and you can see a preview of the JSON object generated based on the set value.
The following figure shows the content options UI preview for template.
-
Click Save.
You have created the template. You can now use the template in a modification to create a Smart Discovery slider for the site.
For a practical example where you can use the template, see Example: Creating a Smart Discovery for category pages.